Avoid Source NAT for none RFC1918 ranges in Azure Firewall

In certain scenarios, some companies are using public IPs for internal purposes. This more common in education or larger old enterprises as they got assigned a sizeable public IP range. This creates some unique challanges for Azure Firewall in combination with ExpressRoute or VPN.
By default, Azure firewall will source NAT communication with IP adresses not defined in the RFC 1918 space (10.0.0.0/8, 172.16.0.0/12 and 192.168.0.0/16).

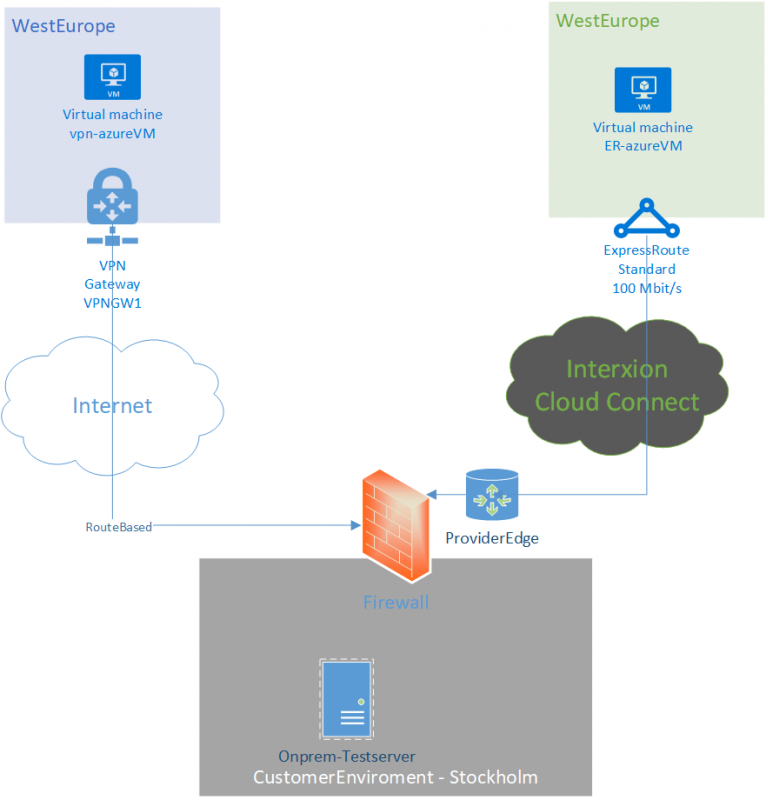
If the none RFC1918 space is coming from ExpressRoute or VPN, it will source NAT to one of the Azure Firewall interfaces. For example if you got 192.168.0.0/26 defined as your AzureFirewallSubnet, it can be 192.168.0.6 for example. This is choosen “random”, since AzureFirewall consist of at least 2 instances behind the scene. Hence, if a virtual machine (Virtual Machine Windows) in Azure with the source IP of 172.0.0.10, sitting “behind” the firewall, communicating with an on-premise virtual machine (Virtual Machine Linux) with the IP of 30.30.30.10, the target machine, will see one of the Azure Firewall IPs as source IP, for example 192.168.0.5.

For certain applications, this can brake functionality and therefor not a desired behaviour. Lucikly Microsoft released a new feature, where we can defined our own ranges, that should be excluded from source NAT. From Azure Portal, navigate to the Firewall and press Private IP range.

Here, already defined is IANA Private ranges (RFC1918), here we can add our 30.30.30.0/16 range, to make it excluded from Source NAT. After change is applied. Virtual Machine Linux will see 172.16.0.10 of Virtual Machine Windows as the source IP, instead of the Azure Firewall Internal IP.

Via ARM template
If you want to add this via ARM templates instead, add the following snippet under the properties configuration

"additionalProperties": {
                    "Network.SNAT.PrivateRanges": "IANAPrivateRanges , 30.30.30.0/24"
                },

ExpressRoute vs. VPN – what is the difference in practise?

A decision to make when developing a hybrid cloud, or just providing access to Azure (or might as well be AWS or GCP) is if a VPN connection will suffice, or you will need an dedicated circuit like Express Route (AWS – Direct Connect, GCP- Dedicated Internetconnect).

Looking on the Microsoft documentation on ExpressRoute, they promise a 99.9 % SLA uptime on the connection. A VPN connection is no SLA on. This is due to Microsoft provisioning redudant circuits to the provider edge in the ExpressRoute scenario and thus can give an SLA.

Be aware to make sure the provider match the SLA to your customer edge. This may differ.

There is a lot to be said about what and what not you can achieve with ExpressRoute or VPN (or combining). To start somewhere, a simple test were conducted. Two similiar Azure environments were setup, one with ExpressRoute and one with VPN – to the same on-premise datacentre.

The test is one ping message, sent every 5 seconds to each Azure environments over 24 hours. The tests were done at the same time. What we want out of the tests are two things, what is the delay and do we have any packet drops?

This were the results

  • 17280 of 17280 requests succeded – 100 %
  • 22.2 MS in average response time
  • 21 MS minimum response time
  • 187 MS maximum response time

  • 17271 of 17280 requests succeded – 99.9479 %
  • 27.7 MS in average response time
  • 25 MS minimum response time
  • 404 MS maximum response time

So what is the differences?

  • 0.0521 % package loss on VPN vs. 0 % on ExpressRoute
  • Average response time is 19.8 % faster in ExpressRoute then VPN
  • Minimum response time is 16 % faster in ExpressRoute then VPN
  • Maximum response time is 53.7 % faster in ExpressRoute

Summary
The biggest advantage of ExpressRoute seems to mitigate the worst case scenarios and more predictable response time, as advertised by Microsoft. Average Latency wise there is also an advantage of ExpressRoute, however, seen in pure ms, not too much of a difference, depending on your application needs.


ExpressRoute monitoring

Microsoft announced that ExpressRoute monitor is now GA! This is great news for all enterprises utilizing ExpressRoute, since there was no easy way to do this before.
ExpressRoute monitoring with Network Performance Monitor (NPM) is now generally available
The ExpressRoute monitor is based in Network Performance monitor (a solution in OMS) that Microsoft adds more and more value to. I thought I would dwelve a bit on the node part of the ExpressRoute monitoring.

The internals of the monitoring works with nodes on selected networks on-premise and in Azure sending packages to one another over port 8084 TCP (or port of your own choosing). Each hop on the way between your on-premise location and Azure are noted as one hop and nicely illustrated on your topology map

To get working nodes, you will need to install OMS agent on each node you want to have in your monitoring. I would recommend at least two at each network location, so a single node failure will not generate false-positives in your monitoring, however you will be fine with one.

Example setup

  • Virtual Network in WestEurope
    • Two virtual machines, preferably running 24/7 with OMS agent configured to the NPM workspace
    • 8084 port opened in guest-firewall and NSG or Appliance firewalls that traffic has to traverse to get to the ExpressRoute
  • On-premise datacentre in Berlin
    • Two servers (virtual or physical), preferably running 24/7 with OMS agent configured to the NPM workspace
    • 8084 port opened in guest-firewall and firewalls that traffic has to traverse to get to the ExpressRoute

After the installation and registration, it usually takes a few minutes before popping up in your NPM. Under NPM –> Configuration, your nodes are located. Here you can add a location comment and check “Use for monitoring” for all the nodes you want to utilize in your ExpressRoute monitoring.
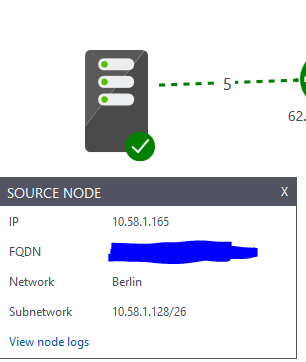
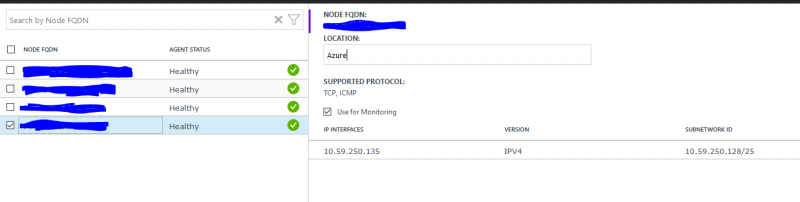
Note: If the OMS agent are not able to traverse with TCP 8084, only ICMP will been seen under Supported Protocol.

After adding nodes,  go to Networks under configuration. By default each node will add it own subnet and get placed in default. So for example if Berlin node is in 192.168.10.0/24, that network will be added in default – hence to make it clearar we can set label on the networks. We can here choose a “Add Network”, and give a better network name, for example Berlin. Repeat for each network you have. Do not forget to press Save (happend to a friend…)

When done, we go back to NPM and choose Topology Dashboard and when we choose our nonde, we will get the network name

We can further divide our network into subnetworks, in case you have several networks on the same location, to make it even more granular.