Convert Azure Firewall to Firewall Manager – part 2

In our previous part, the Firewall policy was created. In this part we will take the policy, do a few minor changes and convert the Firewall we got our framework from.

To start of, the Firewall Policy in itself will not do “anything” until it is applied to Azure Firewall resource (or Secured hub, that is Azure Firewall inside Virtual WAN). The Azure Firewall Policy created can be applied to new Firewall or converting existing firewalls. For this particular case, converting existing Azure Firewall is the target.

Before converting, if we already have another Firewall Policy we want to have as a parent to our current policy, we can proceed to add that to the Azure Firewall policy before. Either we can do this Portal, or handle it via code. Open up the ARM template in VS code and under  “Microsoft.Network/firewallPolicies” resource, under properties, add the following line. Example code

{
    "$schema": "https://schema.management.azure.com/
schemas/2019-04-01/deploymentTemplate.json#",
    "contentVersion": "1.0.0.0",
"parameters":{
..
   "basepolicy": {
            "type": "string",
            "defaultValue": "resourceid"
        }
...
},
"variables:{},
"resources":[
      ..
      "basePolicy": {
                    "id": "[parameters('basepolicy')]"
                }
        ...
        ]
        }
    ]
}

Go live

Converting an existing Azure Firewall to Firewall Manager is none-disruptive operation. How this fit in your change regim, may differ since Azure Firewall more often then not is a central component in your deployment and because of that requires a change window. However from a technical standpoint, there is no traffic lost in the network tests I done during the convert.

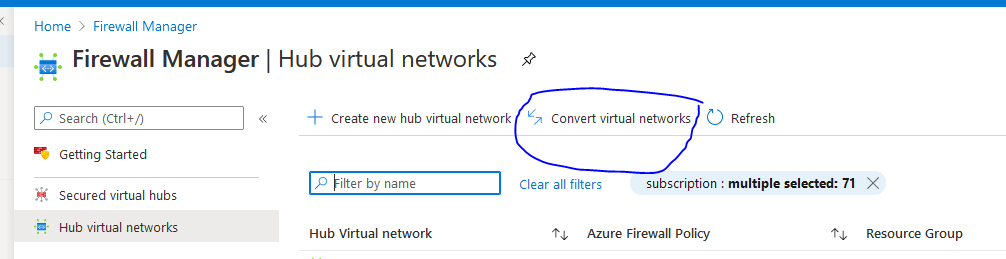
To convert a current Azure Firewall can either be done thru the Portal and follow the guide

If you already have Azure Firewall handled via code, it is three things we need to do (ARM template as example).

  1. Remove all current Azure Firewall rules in the ARM template
  2. Remove threatIntelMode setting
  3. Add the Firewall Policy (the one we converted) resourceID reference

"firewallPolicy": {             
     "id": "resourceIDofFirewallPolicy"         
}

Now, the configuration is ready for deployment. If there is an already pipeline, use that. In this example case, we deploy via Powershell

New-AzResourceGroupDeployment -Name "1" -ResourceGroupName´ "firewall-rg" -Mode Incremental -TemplateFile´
.\firewall.json -TemplateParameterFile´
.\firewall.parameters.json -Verbose

The convert usually takes the same amount of time as an regular Azure Firewall rule update. One thing noted is that if you have IP groups as reference, it usually take a bit more time.

After deployment is complete, we can see the difference in two parts in the Azure Portal. On the Firewall object itself we see a difference that we have fewer options on Settings

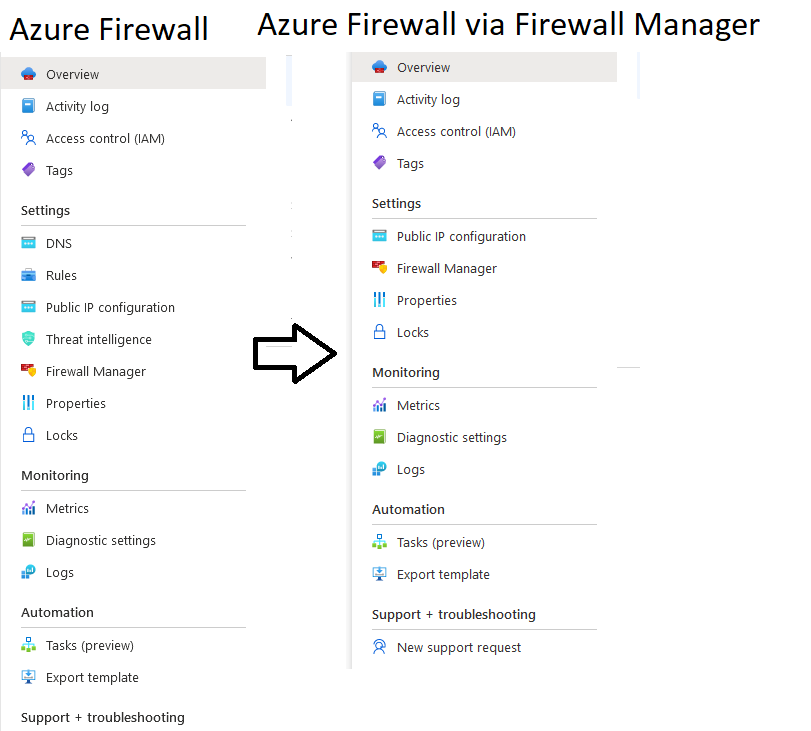
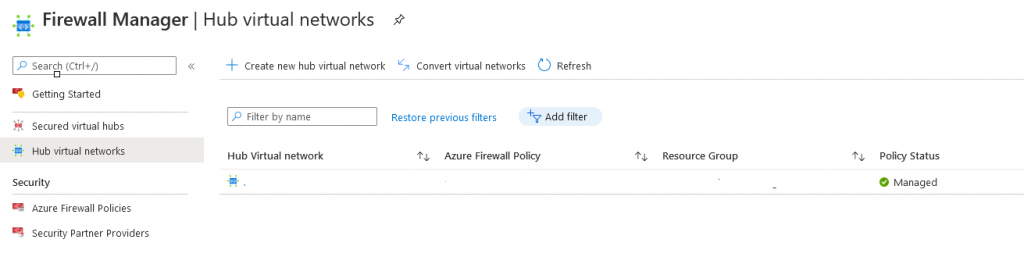
The settings are now moved to the Firewall Manager, where we can see it under “Hub virtual networks”

How routes are distributed to Spoke Virtual networks with a secured hub

Microsoft has a interesting addon for the Virtual WAN offering in preview, Azure Firewall (Manager) in the Azure Virtual WAN. This means that we can filter traffic traversing our Virtual WAN Hub instead of sending it to a NVA or Azure Firewall in another Virtual Network for example.

There is a lot of intresting stuff regarding this, but one that is not that well documented (yet, still preview). Is how routing is working and how the routes are distributed to the different spokes. It differs a bit from the “old” Hub-and-Spoke model, where you had to maintain Route table for each spoke to point to your NVA in the hub. Virtual WAN however solves this differently and at first glance, a more elegant way.

If you press the hyper link on “Learn more” on the configuration page you end up on Azure Firewall manager documentation page, that for the moment lacks the section.

So how does it work? For the default route, choose Send via Azure Firewall, for traffic between VNET, you need to specify the address range for each spoke you add.

When you press save, a deployment is launched and what happens is the Virtual Hub routing tabel get updates. However the Route section on virtual hub in portal is still empty.

However, if you deploy a virtual machine in one of the networks and inspect the route table of the machine you will see the following

Default route is the system learned routes (Virtual Network or VNET peering for example). The interesting are the Virtual Network Gateway, the Virtual Hub injects the routes in the “Gateway” route table to distribute the routes to the different spokes and hence we do not need to maintain a route table on each spoke, compared to the old Hub and spoke model.

Notice, the Firewall manager is still in preview, so this can be changed when the service goes GA.

Avoid Source NAT for none RFC1918 ranges in Azure Firewall

In certain scenarios, some companies are using public IPs for internal purposes. This more common in education or larger old enterprises as they got assigned a sizeable public IP range. This creates some unique challanges for Azure Firewall in combination with ExpressRoute or VPN.
By default, Azure firewall will source NAT communication with IP adresses not defined in the RFC 1918 space (10.0.0.0/8, 172.16.0.0/12 and 192.168.0.0/16).

If the none RFC1918 space is coming from ExpressRoute or VPN, it will source NAT to one of the Azure Firewall interfaces. For example if you got 192.168.0.0/26 defined as your AzureFirewallSubnet, it can be 192.168.0.6 for example. This is choosen “random”, since AzureFirewall consist of at least 2 instances behind the scene. Hence, if a virtual machine (Virtual Machine Windows) in Azure with the source IP of 172.0.0.10, sitting “behind” the firewall, communicating with an on-premise virtual machine (Virtual Machine Linux) with the IP of 30.30.30.10, the target machine, will see one of the Azure Firewall IPs as source IP, for example 192.168.0.5.

For certain applications, this can brake functionality and therefor not a desired behaviour. Lucikly Microsoft released a new feature, where we can defined our own ranges, that should be excluded from source NAT. From Azure Portal, navigate to the Firewall and press Private IP range.

Here, already defined is IANA Private ranges (RFC1918), here we can add our 30.30.30.0/16 range, to make it excluded from Source NAT. After change is applied. Virtual Machine Linux will see 172.16.0.10 of Virtual Machine Windows as the source IP, instead of the Azure Firewall Internal IP.

Via ARM template
If you want to add this via ARM templates instead, add the following snippet under the properties configuration

"additionalProperties": {
                    "Network.SNAT.PrivateRanges": "IANAPrivateRanges , 30.30.30.0/24"
                },

SQL Backup with Azure Recovery Services

Microsoft announced a bit back that they now include SQL Backup of SQL Server installed on Azure VMs. https://azure.microsoft.com/en-us/blog/azure-backup-for-sql-server-on-azure-vm-public-preview/. This enables us to gather most (if not yet all) backup services in one tool.

Setup
First of, you will need a Recovery service vault in the same subscription as your SQL Server resides. When recovery service is in place, choose backup and there is an option “SQL Server in Azure VM”

This will prompt to run a discovery, to search for Azure virtual machines with SQL Server on it. After it finds it, it will install a small windows service AzureBackupWindowsWorkload that utilize a user (NT Service\AzureWLBackupPluginSvc) for the backup. This process takes in my experience a few minutes. If your VM was not provisioned thru Azure SQL Server image, the SQLIaaSExtension will need to be installed and add NT Service\AzureWLBackupPluginSvc as Sysadmin user on the SQL Server instance.

After discovery is completed, there will be a list with SQL Server Instances and what databases resides on the particular instance. From here, either check the top to get all database, or choose what databases that are going to be backed up.

Next step is configure the backup policy. There is a default created that will do a full/diff backup each day, and logbackup each hour. Or create a policy that match your company RPO needs. (During preview the default policy cannot be changed)

After configuration, recommended is to intial a backup, this will run an initial full backup of the databases. The progress can be tracked in Recovery service under backup jobs

Restore
A backup is only as good as its ability to be restored. Restores are intiated from Recovery service. Simply choose the database that are going to be recovered and choose Restore DB

Restores option are to overwrite current database or to restore on Alternate Location (on same SQL Server with different name or other registrered SQL Servers). Makes it handy to restore one offs when you want to test something on a database or do restore tests

If the database is in full recovery model, the possibility to restore in a specific time and date will be presented, or from latest full/diff backup. This experience is similiar what is presented in SQL Management Studio. Easy and to the point.

Lastly, a few moreoption to set in NO Recovery and the physical name and location of the .mdf and .ldf files are given. After that, review and press Restore. The restore job can be tracked under Backup jobs in Recovery services.

Summary
This functionality adds a bit in the puzzle to make the backup and recovery service more complete. The easiness of configuration and restore makes it available for a broad audience.

Powershell OneLiners #1

Sometimes, the need for a certificate to verify something quickly. Here is an example how to add certificate that expire after 50 years on two domain names from your Powershell prompt.

New-SelfSignedCertificate -DnsName "app.domain.local", "test-app.domain.local" -CertStoreLocation "cert:\LocalMachine\My" -NotAfter (Get-date).AddYears(50) -KeyExportPolicy Exportable

ExpressRoute vs. VPN – what is the difference in practise?

A decision to make when developing a hybrid cloud, or just providing access to Azure (or might as well be AWS or GCP) is if a VPN connection will suffice, or you will need an dedicated circuit like Express Route (AWS – Direct Connect, GCP- Dedicated Internetconnect).

Looking on the Microsoft documentation on ExpressRoute, they promise a 99.9 % SLA uptime on the connection. A VPN connection is no SLA on. This is due to Microsoft provisioning redudant circuits to the provider edge in the ExpressRoute scenario and thus can give an SLA.

Be aware to make sure the provider match the SLA to your customer edge. This may differ.

There is a lot to be said about what and what not you can achieve with ExpressRoute or VPN (or combining). To start somewhere, a simple test were conducted. Two similiar Azure environments were setup, one with ExpressRoute and one with VPN – to the same on-premise datacentre.

The test is one ping message, sent every 5 seconds to each Azure environments over 24 hours. The tests were done at the same time. What we want out of the tests are two things, what is the delay and do we have any packet drops?

This were the results

  • 17280 of 17280 requests succeded – 100 %
  • 22.2 MS in average response time
  • 21 MS minimum response time
  • 187 MS maximum response time

  • 17271 of 17280 requests succeded – 99.9479 %
  • 27.7 MS in average response time
  • 25 MS minimum response time
  • 404 MS maximum response time

So what is the differences?

  • 0.0521 % package loss on VPN vs. 0 % on ExpressRoute
  • Average response time is 19.8 % faster in ExpressRoute then VPN
  • Minimum response time is 16 % faster in ExpressRoute then VPN
  • Maximum response time is 53.7 % faster in ExpressRoute

Summary
The biggest advantage of ExpressRoute seems to mitigate the worst case scenarios and more predictable response time, as advertised by Microsoft. Average Latency wise there is also an advantage of ExpressRoute, however, seen in pure ms, not too much of a difference, depending on your application needs.


Force a reboot with DSC in ARM-template

When deploying an ARM-tempalate, the Azure Virtual Network got updated with the new DNS server. The Virtual machines deployed before this update, still got the old DNS client settings, before the VM gets rebooted. This becomes a bit of a challange, when trying to domain join the computer with Desired State Configuration (DSC), since it will not find the domain controller (if not the old DNS settings where already pointed to a current domain controller).

To force a reboot thru DSC can be achieved by the module xPendingReboot and DSC Script. xPendingReboot checks if there is a pending reboot of the machine and works in conjunction with the Local Configuration Manager (LCM). If LCM is set to RebootNodeIfNeeded=$true, it will reboot. However, a new machine got no pending reboot. To achieve this we will need to set DSCMachineStatus to 1 and write a small registry item. This will indicate there is a PendingReboot.

First we need to load the module (including the domainJoin as well)

Import-DscResource -ModuleName xPendingReboot, xDSCDomainjoin

Set the LCM RebootNodeIfNeeded to true

LocalConfigurationManager 
{
   RebootNodeIfNeeded = $true
}

Create a xPendingReboot resource

xPendingReboot Reboot
{
   Name = "Reboot"
}

Add our “fake” reboot.

Script Reboot
{
    TestScript = {
    return (Test-Path HKLM:\SOFTWARE\MyMainKey\RebootKey)
    }
    SetScript = {
			New-Item -Path HKLM:\SOFTWARE\MyMainKey\RebootKey -Force
			$global:DSCMachineStatus = 1 
        }
    GetScript = { return @{result = 'result'}}
}

and finally the domainjoin with a DependsOn so it will happend before domainjoin.

xDSCDomainjoin JoinDomain
{
  Domain = $DomainName
  Credential = $DomainCreds
  DependsOn = "[Script]Reboot"
}