Convert Azure Firewall to Firewall Manager – part 2

In our previous part, the Firewall policy was created. In this part we will take the policy, do a few minor changes and convert the Firewall we got our framework from.

To start of, the Firewall Policy in itself will not do “anything” until it is applied to Azure Firewall resource (or Secured hub, that is Azure Firewall inside Virtual WAN). The Azure Firewall Policy created can be applied to new Firewall or converting existing firewalls. For this particular case, converting existing Azure Firewall is the target.

Before converting, if we already have another Firewall Policy we want to have as a parent to our current policy, we can proceed to add that to the Azure Firewall policy before. Either we can do this Portal, or handle it via code. Open up the ARM template in VS code and under  “Microsoft.Network/firewallPolicies” resource, under properties, add the following line. Example code

{
    "$schema": "https://schema.management.azure.com/
schemas/2019-04-01/deploymentTemplate.json#",
    "contentVersion": "1.0.0.0",
"parameters":{
..
   "basepolicy": {
            "type": "string",
            "defaultValue": "resourceid"
        }
...
},
"variables:{},
"resources":[
      ..
      "basePolicy": {
                    "id": "[parameters('basepolicy')]"
                }
        ...
        ]
        }
    ]
}

Go live

Converting an existing Azure Firewall to Firewall Manager is none-disruptive operation. How this fit in your change regim, may differ since Azure Firewall more often then not is a central component in your deployment and because of that requires a change window. However from a technical standpoint, there is no traffic lost in the network tests I done during the convert.

To convert a current Azure Firewall can either be done thru the Portal and follow the guide

If you already have Azure Firewall handled via code, it is three things we need to do (ARM template as example).

  1. Remove all current Azure Firewall rules in the ARM template
  2. Remove threatIntelMode setting
  3. Add the Firewall Policy (the one we converted) resourceID reference

"firewallPolicy": {             
     "id": "resourceIDofFirewallPolicy"         
}

Now, the configuration is ready for deployment. If there is an already pipeline, use that. In this example case, we deploy via Powershell

New-AzResourceGroupDeployment -Name "1" -ResourceGroupName´ "firewall-rg" -Mode Incremental -TemplateFile´
.\firewall.json -TemplateParameterFile´
.\firewall.parameters.json -Verbose

The convert usually takes the same amount of time as an regular Azure Firewall rule update. One thing noted is that if you have IP groups as reference, it usually take a bit more time.

After deployment is complete, we can see the difference in two parts in the Azure Portal. On the Firewall object itself we see a difference that we have fewer options on Settings

The settings are now moved to the Firewall Manager, where we can see it under “Hub virtual networks”

Convert Azure Firewall to Firewall Manager – part 1

Firewall Manager and Firewall policies has been the new kid on the block for some time now (General avaialable in June) and with the new Azure Firewall Premium Firewall only being supported with Firewall Policy (link), it is logical to start migrating existing Azure Firewall to utilize Firewall Policy to be able to consume all new services.

The first part is to get the existing ruleset setup in your existing firewall to a new Azure Firewall policy. Microsoft have published a article with an script for it here . There were a few missing things such as IP groups support and some assumption, so a slightly modified script can be found here at my git repo link .

The script will do the following

  • Create an Firewall policy with specified name (and resource group if not already created)
  • Poll all info from the specified Firewall
  • Set threat detection setting into the Firewall policy
  • Loop thru Application Rule set, Network Rule set and NAT rule set from the source and apply that to the Azure Firewall policy created

To run the script, open up either Cloudshell or your local Powershell prompt and select the subscription where Azure Firewall is located. Fill in your current firewall resource group and firewall name and then the names of the Firewall Policy and resource group.

.\Export-RulesToFirewallPolicy.ps1 -FirewallResourceGroup "firewall-rg" -FirewallName "firewall" -FirewallPolicyResourceGroup "firewallpolicy-rg" -FirewallPolicyName "firewallpolicy" -FirewallPolicyLocation westeurope

Now the firewall policy are ready to either be used in to convert existing firewall or a new Azure Firewall.

Enable Hybrid benefit on all already deployed Windows VMs in your subscription

Hybrid benefit in Azure means that you are purchasing the Windows license elsewhere, instead of “pay-as-you-go” with the VM consumption. The reason to do this is either your organization already owns licenses or purchased licensese to save cost (there is a brake even when it makes sense to buy the license outside of Azure).

To retrofit this to existing subscription, it is quite straight forward with Powershell. It is just a metadata for the virtual machine, so there is no down time required (reference https://docs.microsoft.com/en-us/azure/virtual-machines/windows/hybrid-use-benefit-licensing#convert-an-existing-vm-using-azure-hybrid-benefit-for-windows-server) .

The following Powershell code takes your current logged in Azure subscription context, get all Windows machines that does not have Hybrid benefit enabled and loops thru them, enabling Hybrid benefit.

[Cmdletbinding()]
Param
(
)


$nonehbvm = Get-AzVM -Status | where{$_.StorageProfile.OsDisk.OsType -eq "Windows" -and (!($_.LicenseType))} | Select-Object Name,ResourceGroupName,Licensetype
foreach($i in $nonehbvm)
{
    $vm = Get-AzVM -ResourceGroup $($i.ResourceGroupName) -Name $($i.Name) 
    Write-Verbose "Setting hybrid benefit on VM $($i.Name) "
    $vm.LicenseType = "Windows_Server"
    Update-AzVM -ResourceGroupName $($i.ResourceGroupName) -VM $vm
} 

Setup Docker on Windows 10

Firing up containers locally is always useful, whatever it is for learning, developing or just being curious.

First off, verify that you have virtualization enabled on your computer, it should return true

(Get-WmiObject Win32_Processor).VirtualizationFirmwareEnabled
True

Then enable Containers and Hyper-V, make sure to run Powershell as admin

Start-Process Powershell -verb Runas
Enable-WindowsOptionalFeature -Online -FeatureName "Microsoft-Hyper-V" -All
Enable-WindowsOptionalFeature -Online -FeatureName "Containers"

Install Docker module and binaries, confirm.

Install-Module -Name DockerMsftProvider -Repository PSGallery -Force
Install-Package -Name docker-desktop  -ProviderName Chocolatey

and then finally, restart your computer

Restart-Computer -Force

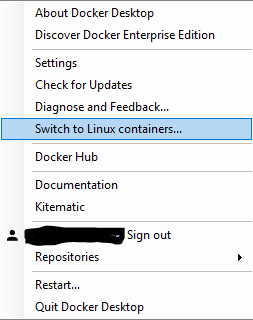
Now you have docker installed on your system. To switch between Linux or Windows containers, choose on the Docker tray icon

Enjoy!

Powershell OneLiners #1

Sometimes, the need for a certificate to verify something quickly. Here is an example how to add certificate that expire after 50 years on two domain names from your Powershell prompt.

New-SelfSignedCertificate -DnsName "app.domain.local", "test-app.domain.local" -CertStoreLocation "cert:\LocalMachine\My" -NotAfter (Get-date).AddYears(50) -KeyExportPolicy Exportable

Azure API Management setup with networking via VNET

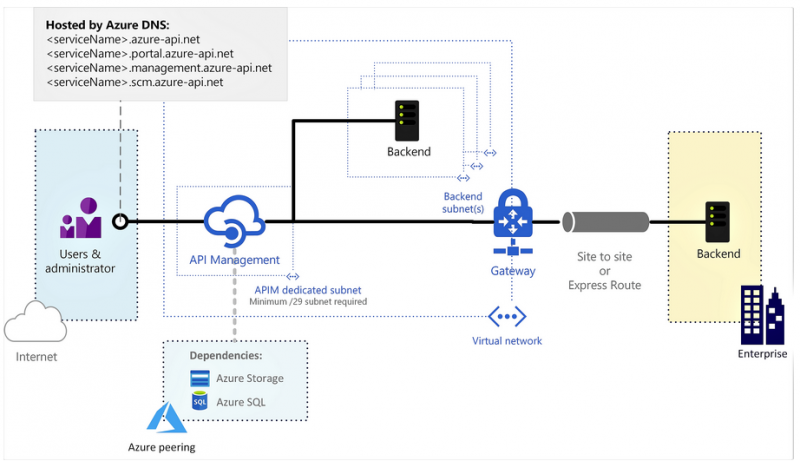
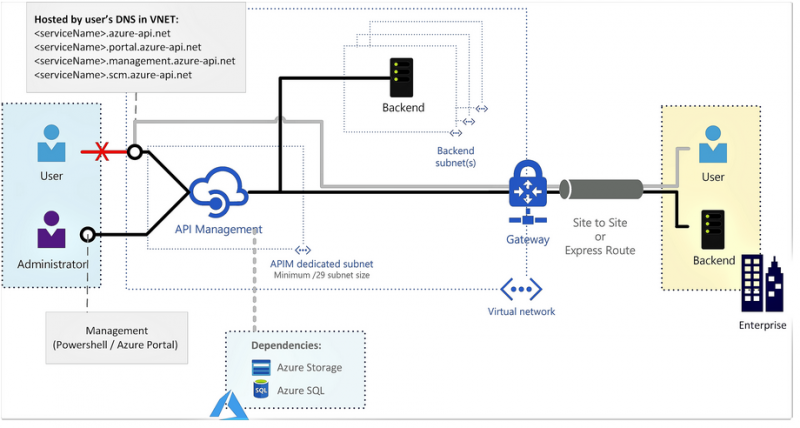
API Management makes it possible to publish APIs for exteranl and/or internal purposes in a secure manner. The Developer or Premium tier enables virtual network support, giving the possibility to access resources in your virtual network, or on-premise if you have VPN/ExpressRoute setup.

There is two different kind of network integrations for API management, external and internal. The External are external publishing and the gateway are able to access internal resources.

While an Internal only offer it API services internally

For our example, we will go with the External.

Before proceeding, a dedicated subnet need to be setup just for API management (a /29 works fine) and if there is an advertised default route, there is a need to add a User defined route to Internet as a default one.

First off, we need the ResourceID for the subnet, copy paste the resourceID

$VNET = Get-AzureRmVirtualNetwork  -Name "API-VNET" -ResourceGroup "Common-RG"
Get-AzureRmVirtualNetworkSubnetConfig -Name "API-VNET-SUBNET" -VirtualNetwork $VNET

After this, defined the API Management Network and save it to the variable $apivnet

$Location = "WestEurope"
$apivnet = New-AzureRmApiManagementVirtualNetwork -Location $Location -SubnetResourceId "/subscriptions/b6c5a626-dfd6-40ca-9408-525e7345e8de/resourceGroups/Common-RG/providers/Microsoft.Network/virtualNetworks/API-VNET3/subnets/API-VNET-SUBNET"

Now, create the API Management, specify a Name, an Organization, AdminEmail and the SKU (need to be Developer or Premium) and finally the VpnType, that is the networking type.

$APIRG = New-AzureRMResourceGroup -Name "API-RG" -Location $Location
New-AzureRmApiManagement -ResourceGroupName $($APIRG.ResourceGroupName)  -Name "api-dev" -Location $Location -Organization "SystembolagetDev" -AdminEmail "foo@bar.org" -Sku Developer -VirtualNetwork $apivnet -VpnType External

The command will take a while, since the VNET integration takes up to 15 minutes to complete. After that, we are set!

Force a reboot with DSC in ARM-template

When deploying an ARM-tempalate, the Azure Virtual Network got updated with the new DNS server. The Virtual machines deployed before this update, still got the old DNS client settings, before the VM gets rebooted. This becomes a bit of a challange, when trying to domain join the computer with Desired State Configuration (DSC), since it will not find the domain controller (if not the old DNS settings where already pointed to a current domain controller).

To force a reboot thru DSC can be achieved by the module xPendingReboot and DSC Script. xPendingReboot checks if there is a pending reboot of the machine and works in conjunction with the Local Configuration Manager (LCM). If LCM is set to RebootNodeIfNeeded=$true, it will reboot. However, a new machine got no pending reboot. To achieve this we will need to set DSCMachineStatus to 1 and write a small registry item. This will indicate there is a PendingReboot.

First we need to load the module (including the domainJoin as well)

Import-DscResource -ModuleName xPendingReboot, xDSCDomainjoin

Set the LCM RebootNodeIfNeeded to true

LocalConfigurationManager 
{
   RebootNodeIfNeeded = $true
}

Create a xPendingReboot resource

xPendingReboot Reboot
{
   Name = "Reboot"
}

Add our “fake” reboot.

Script Reboot
{
    TestScript = {
    return (Test-Path HKLM:\SOFTWARE\MyMainKey\RebootKey)
    }
    SetScript = {
			New-Item -Path HKLM:\SOFTWARE\MyMainKey\RebootKey -Force
			$global:DSCMachineStatus = 1 
        }
    GetScript = { return @{result = 'result'}}
}

and finally the domainjoin with a DependsOn so it will happend before domainjoin.

xDSCDomainjoin JoinDomain
{
  Domain = $DomainName
  Credential = $DomainCreds
  DependsOn = "[Script]Reboot"
}

Pass null conditions to JSON-template with Powershell – splat!

With Azure ARM templates we have the possibility to add conditions. Meaning that we can for example decide if we want to deploy a certain resource or not that is defined in the JSON-template. This gives us great flexibility when authoring ARM templates.

An example is that you might decide to have an option to create a VPN-Gateway for your Network template and want to option to say Yes or No as input. If in the deployment you choose No, you do not really want to enter all the other parameters required for VPN, even if they are defined in your ARM Template. The parameter file you can choose as input (and is created by default if you work with Visual Studio) handles this null values. So far so good.

However, sometimes, we want to solve this from Powershell and inject parameters directly, without needing a parameter file. To accomplish this, we will need to create a hash table with the relevant parameters. For example we have two parameters. VPN, that is yes or no. If we choose no, we do not really want enter a VPNSharedKey, since it will be not needed.

First we enter the input parameters to the PowerShell script. The script gives the operator the possibility to choose two answers on VPN, yes or No.

[Cmdletbinding()]
Param
(
    [Parameter(Mandatory=$true)]
    [ValidateSet('yes','no')]
    [string[]]$VPN,
    [Parameter(Mandatory=$false)]
    [String]$VPNSharedKey
)

Then we pass this variables into our hash table

$Parameters @{
VPN ="$VPN"
VPNSharedKey ="$VPNSharedKey"
}

Hence we can launch the Powershell script (Azuredeploy.json being our template file)

.\Deploy-ToAzure.ps1 -VPN no -TemplateFile C:\Azuredeploy.json

For further reading, see Microsoft documentation about splatting about_Splatting